In this tutorial I am going to cover Schema creation in Oracle XE database which is required as a starting step before installing the SOA Suite 11g.
Here in this tutorial we are going to Run Repository Creation Utility provided by Oracle for SOA Suite 11g ( Version 11.1..1.3 ).
Go to the folder where you have downloaded the Repository Creation Utility version 11.1.1.3 ( c:\SOAInstallables as per tutorial I)
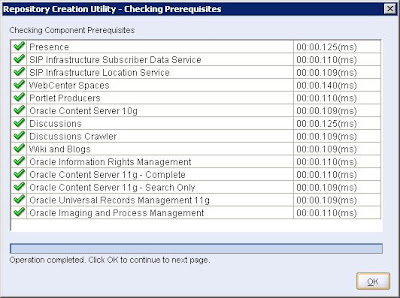
Double click the rcu.bat in folder structure similar to ofm_rcu_win_11.1.1.3.0_disk1_1of1\rcuHome\BIN\ and you should see below screen sequence.
1. Welcome Screen
2. As we want to create requred schema for installation select create.
3. Provide the required details
Note : username used here is SYS, this should be the user with SYSDBA role
4. Select the Components for which you want to generated schema tables.
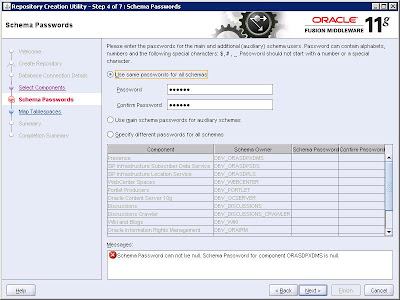
5. Here you can choose to provide single username / password for all schema component or also you do have flexibility to provide username/password for individual components. For development environment use single username/password for all components.
6. This screen will allow you to choose different tables spaces for the components. kept it defult and press next.
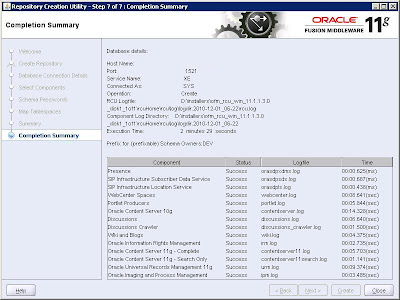
7. Summary of all installation is generated at the last. Click close the finish the process.
Friday, December 31, 2010
Wednesday, December 1, 2010
Upgrade Weblogic Server 10.3.2.0 to Weblogic Server 11g (10.3.3.0)
Here in this tutorial we are going to upgrade Oracle Weblogic Server 10.3.2.0 to Weblogic Server 11g i.e. 10.3.3 Version. This is very simple are pretty straight forward process.
If you are upgrading SOA Suite 11g 11.1.1.2 to SOA Suite 11.1.1.3 they you may required this to upgrade you Weblogic Server 10.3.2.0.
Go to the Program Files and Weblogic Installation and select Smart Update.
This is gona ask you for username and password for Oracle Support as shown in below screen shot. Provide the required information and login,
Now you should able to see Smart Update Wizard Screen as shown below, go to the Maintanance Packs and select Update.
As shown in below screen select release 10.3.2.0 and in right you should be able to see Weblogic Platform (10.3.3.0) in Upgrade options. Click OK
This will start Oracle Installer for Weblogic server 10.3.3.0 as shown in below screen. Click Next
Uncheck if you dont want to receive any update from oracle
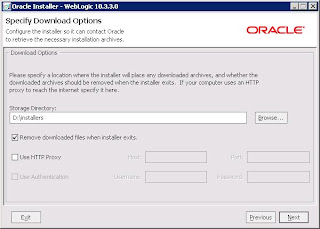
Select the location where you want to download the installation files.
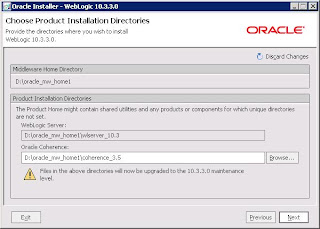
Here in below screen you need to specify in which directories you want to install the upgrade. Click Next to start installation process
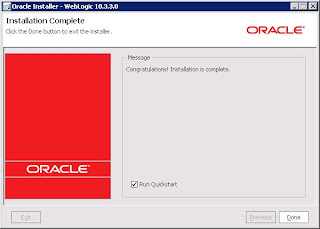
After successful installation/upgrade you should be able to see below screen.
That's it. you done with the upgrade.
Labels:
11g,
Installation,
SOA Suite,
Tutorial,
Weblogic
Tutorial 2 : How to Install Oracle SOA Suite 11g (11.1.1.3) Part II - Installing Oracle XE Database
This tutorial has to be followed properly and Oracle XE database has to be installed and configured perfectly. For successfull installation of SOA Suite 11g, this Oracle XE database has to be up and running before proceeding further for other tutorials.
If you have not download yet, Get the latest copy from Oracle website at http://www.oracle.com/technetwork/database/express-edition/downloads/index.html and save it to c:\SOAInstallables (This is the same director which we have created in first tutorial of How to Install Oracle SOA Suite 11g.
When you download the Oracle XE database make sure you download the Universal Installer
Note : When you are running Repository creation utility for creating schema in database before installing SOA Suite 11g, you will see warning that the database you are using is too old. you can safely ignore this warning as it applies for production environment.
As you are installing the Oracle XE as database server for SOA Suite 11g installation, It is important to know that what is the version when we say we are using Oracle XE Database. Database version for Oracle XE is 10.2.0.1 and SOA Suite 11g Installation requires actually 10.2.0.4 or higher or 11.1.0.7 or higher. And that is the reason we are getting the warning while running the Repository Creation Utility before installing SOA Suite 11g. Oracle XE is very good choice for small footprint database in SOA Suite 11g development environment.
Ok, Now you are ready to start with the installation of Oracle XE database for seting up SOA Suite 11g development environment.
Step 1 : Go to c:\SOAInstallables directory and click on OracleXEUniv.exe and It will start the Installation wizard as below. Click Next to proceed
Step 2: As shown in below screen shot select "I accept" and click Next
Step 3 : Specify the location where you want to install Oracle 10g Express Edition server and click next.
Step 4 : specify the password for the SYS and SYSTEM
user account for this database
Step 5 : Reviw the setting and click on Install
Step 6 : Wizard will start installing and copying files
Step 7 : Click on Finish
Step 8 : Go to this URL http://127.0.0.1:8080/apex/ and login using SYS and password you have specified for the SYS and SYSTEM user accounts while creating database. You will be able to see four icons
- Administration
- Object browser
- SQL
- Utilities
- Oracle Essentials: Oracle Database 11g
- Oracle 11g For Dummies
- Expert Oracle Practices: Oracle Database Administration from the Oak Table
- Oracle Database 11g DBA Handbook (Osborne ORACLE Press Series)
- Oracle Database 11g The Complete Reference (Osborne ORACLE Press Series)
- Beginning Oracle Database 11g Administration: From Novice to Professional
- Oracle Database 10g Performance Tuning Tips & Techniques (Osborne ORACLE Press Series)
- Expert Oracle Database Architecture: Oracle Database Programming 9i, 10g, and 11g Techniques and Solutions, Second Edition
- Oracle Database 10g: A Beginner's Guide (Osborne ORACLE Press Series)
- Oracle Database 11g PL/SQL Programming (Osborne ORACLE Press Series)
- Expert Oracle Database 11g Administration (Expert's Voice in Oracle)
Tutorial 1 : How to Install Oracle SOA Suite 11g (11.1.1.3) Part I
Oracle SOA Suite 11g is consists of multiple oracle products and hence it requires to install and configure each of those products in particular sequence to make it work.
Here in this tutorial, I am going to list all the products you will require to install for Oracle SOA Suite 11g (11.1.1.3) and what are the requirement for those products to work correctly. And in next subsequent tutorials I am going to cover each product installation one by one. Below is the list of Tutorials and I am going update this post as and when I am ready with subsequent product installation tutorials.
Tutorial 2 : Installing Oracle 10g Express Edition database
Tutorial 3 : Creating repository using Repository Creation Utility ( version 11.1.1.3)
Memory Requirements :
To install Oracle SOA Suite 11g, you will required atleast total around 12 GB of memory space including installable files, else you may need to seperate out your installation of SOA Server, Weblogic Server, JDeveloper and Database server separately on different machines.
Download Installable Files :
Download all below files and store it at particular location on local machine say c:\SOAInstallables
Go to the http://www.oracle.com/technetwork/middleware/soasuite/downloads/index.html and download required software.
We are going to install SOA Suite 11g (11.1.1.3) and all the products needs to be install for setting up SOA Suite 11g (11.1.1.3) are listed at http://www.oracle.com/technetwork/middleware/soasuite/downloads/index.html.
Overall process installation map will be something similar to below.
Here in this tutorial, I am going to list all the products you will require to install for Oracle SOA Suite 11g (11.1.1.3) and what are the requirement for those products to work correctly. And in next subsequent tutorials I am going to cover each product installation one by one. Below is the list of Tutorials and I am going update this post as and when I am ready with subsequent product installation tutorials.
Tutorial 2 : Installing Oracle 10g Express Edition database
Tutorial 3 : Creating repository using Repository Creation Utility ( version 11.1.1.3)
Memory Requirements :
To install Oracle SOA Suite 11g, you will required atleast total around 12 GB of memory space including installable files, else you may need to seperate out your installation of SOA Server, Weblogic Server, JDeveloper and Database server separately on different machines.
Download Installable Files :
Download all below files and store it at particular location on local machine say c:\SOAInstallables
Go to the http://www.oracle.com/technetwork/middleware/soasuite/downloads/index.html and download required software.
We are going to install SOA Suite 11g (11.1.1.3) and all the products needs to be install for setting up SOA Suite 11g (11.1.1.3) are listed at http://www.oracle.com/technetwork/middleware/soasuite/downloads/index.html.
- Database
If you don't already have an Oracle database installed, choose Oracle Express Edition for a small footprint database. (Oracle XE is suitable for development only. Ignore the warning during installation about the database version as that pertains to production installations.) - WebLogic Server
Download WebLogic Server 10.3.3.from the FMW download page, in the Runtime Software section - Repository Creation Utility
Download RCU 11.1.1.3.0 from the FMW download page, in the Required Additional Software section. - SOA Suite & Patch
Download SOA Suite 11.1.1.2.0 from the FMW download page, in the Runtime Software section.
Download SOA Suite 11.1.1.3.0 (patch) from the FMW download page, in the Runtime Software section. - JDeveloper
Download JDeveloper 11.1.1.3.0 from the FMW download page. Look for JDeveloper and Application Development Framework in the Required Addition Software section. - SOA Extension for JDeveloper
Install the SOA Extension using the JDeveloper Update Center. From the JDeveloper menu choose Help > Check for Updates. In the Update Wizard, select Search Update Centers and ensure Oracle Fusion Middleware Products is checked ( screenshot). Then ensure that Oracle SOA Composite Editor is checked ( screenshot, your version may not match the screenshot exactly). The SOA Extension is approximately 200 MB.
Overall process installation map will be something similar to below.
 |
| Image from Oracle.com |
Subscribe to:
Comments (Atom)


