Showing posts with label Weblogic. Show all posts

Thursday, August 6, 2015

How to Create / Configure / Maintain JMS Server & Module in Weblogic 11g / 12c

In this post here i have tried to put across step by step process to create JMS Server , JMS Module etc to complete required full configuration for Weblogic JMS server for 12c. Steps will remain same for weblogic 11g as well.


  • Login to Weblogic console and go to Domain Structure -> Services -> Messaging
  • Select JMS Server
  • Create a new JMS Server page will open, enter below details
  • Click Next
  • On the next screen select Target. It should be the server where you want to create this JMS Server.
  • Click Finish 
  • Now we have JMS Server and we need to add JMS Module 
  • Go to Domain Structure -> Services -> Messaging -> Select JMS Module
  • Click on New button to create new JMS Module
  • Enter required information in create new JMS page
    • Name : UserJMSModule
    • Descriptor : UserJMSModule
    • Location in Domain : leave it blank to create it at default location and click Next
  •  On the next page select appropriate target server where you want to deploy this JMS Module and select Next
  • In the next window leave the check box "Would you like to add resources to this JMS system module?" unchecked and click finish
  • Message should be displayed as "The JMS module was created successfully". 
  • Under settings for UserJMSModule go to subdeployment tab and click New
  • Provide the name of subdeployment as "UserSubDeployment" and click next
  • Select the previously created "UserJMSServer" and click on finish and message should be displayed as "Subdeployment created successfully"
  • Click on Activate the changes to make the changes available for use in the domain.


Monday, July 14, 2014

Exception in thread “main” java.net.MalformedURLException: Unsupported protocol: t3

Unsupported protocol : t3 error will come when you are trying to connect to weblogic server through your Java code using t3 URL. For this you need to include weblogic Network protocol library to the project classpath.

Add below two jar file to your project's build path :

  • wlclient.jar
  • wljmxclient.jar
Or Simply add
  • wlfullclient.jar


Wednesday, December 1, 2010

Upgrade Weblogic Server 10.3.2.0 to Weblogic Server 11g (10.3.3.0)

Here in this tutorial we are going to upgrade Oracle Weblogic Server 10.3.2.0 to Weblogic Server 11g i.e. 10.3.3 Version. This is very simple are pretty straight forward process.

If you are upgrading SOA Suite 11g 11.1.1.2 to SOA Suite 11.1.1.3 they you may required this to upgrade you Weblogic Server 10.3.2.0. 

Go to the Program Files and Weblogic Installation and select Smart Update.

This is gona ask you for username and password for Oracle Support as shown in below screen shot. Provide the required information and login,


Now you should able to see Smart Update Wizard Screen as shown below, go to the Maintanance Packs and select Update.


As shown in below screen select release 10.3.2.0  and in right you should be able to see Weblogic Platform (10.3.3.0) in Upgrade options. Click OK


This will start Oracle Installer for Weblogic server 10.3.3.0 as shown in below screen. Click Next


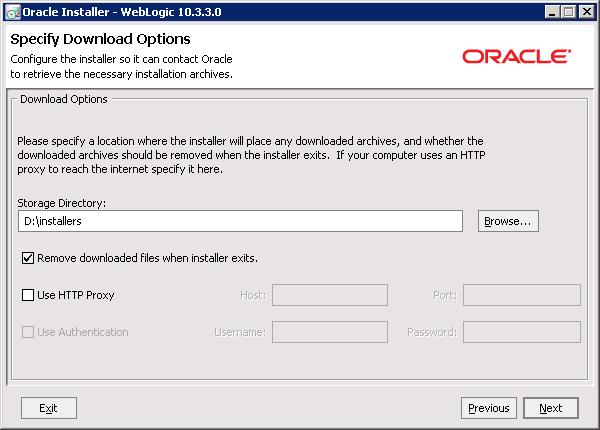
Uncheck if you dont want to receive any update from oracle


Select the location where you want to download the installation files.


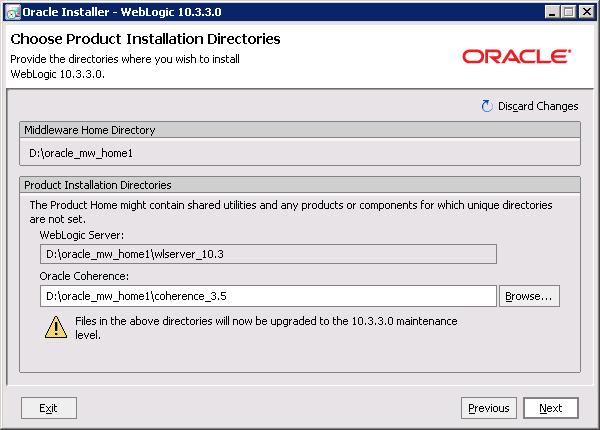
Here in below screen you need to specify in which directories you want to install the upgrade. Click Next to start installation process


After successful installation/upgrade you should be able to see below screen.


That's it. you done with the upgrade.

Sunday, August 8, 2010

How to Subscribe to Distributed Topic without Message Duplication

Mastering BEA WebLogic Server: Best Practices for Building and Deploying J2EE ApplicationsThis is about very interesting scenario I came across and I think many of you might have also faced the smiliar situation.

Scenario : I have one distributed topic in my Integration scenario, and I am subscribing to that Distributed topic (Clustered Environment ofcourse) with a proxy service (Oracle service Bus 10g) and storing the same message again into another distributed Queue. So whenever message is getting published to the Distributed Topic, Message is stored in both the clusters and as a result I was ending up with two same messages in single Distributed Topic, each message in one cluster. Because of this, my proxy service was getting called twice for the same message and same two messages were getting stored in Distributed Queue.

WebLogic: The Definitive GuideWell so issue here is duplicate messages in distributed topic, but I guess writing a word "issue" is not correct, because Distributed Topics are made to behave like this. This is what we call expected behaviour. But my requirement was how to remove this duplication from Distributed Topic.

Here is the trick, Create two seperate Topic (Not distributed Topic) and targeting both the clusters one by one. Now we have something called "Local JNDI Name" in Topic. Set the same value for this field for both the topic and refer to this common name while refering to Topic. This will give very much similar functionaliy like Distributed Topic and yeah ofcourse without message duplication.

Limitation : All limitations applied to local JNDI name will be implicit to this solution.

Sun Cluster Data Service for Weblogic Server Guide for Solaris OS 
Oracle Application Server 10g: J2EE Deployment and Administration 

Thursday, August 5, 2010

HermesJMS - Installation, Setup & Monitoring JMS Queue, Topic

Professional Oracle WebLogic Server (Wrox Programmer to Programmer)This blog is specifically for the people who requires real time monitoring of the JMS resoruces and their in & out. This posting is for installation & setup of HermesJMS Tool on windows environment for monitoring Weblogic 9/10g/or higher versions's JMS resources.

From weblogic 9 onwared , bea (now oracle) started providing web UI for monitoring JMS messages but for a single flow of message traveling through many number of JMS resources like topic , queue etc on Web UI is such headache. At this time HermesJMS is very handy tool to monitor and capture all those details.

HermesJMS Installation, Setup & Monitoring Tutorial

HermesJMS is an extensible console helps you communicate with JMS providers making your life lot easier to browse or search queues and topics, copy messages around and removing them. It fully integrates with JNDI letting you discover administered objects stored, create JMS sessions from the connection factories and use any destinations found. Many providers include a plugin that uses the native API to do non-JMS things like getting queue depths (and other statistics) or finding queue and topic names

Supports following providers :


IBM® MQ Series® and Websphere MQ® Interview Questions, Answers, and Explanations: Unofficial MQ Series® Certification Review


    IBM® MQ Series® and Websphere MQ® Interview Questions, Answers, and Explanations: Unofficial MQ Series® Certification Review
  • Active MQ
  • Arjuna MQ
  • Tibco EMS
  • Fiorano MQ
  • JBoss MQ
  • JORAM
  • OpenJMS
  • Oracle, Pramati
  • SAP
  • SeeBeyond ICAN
  • SeeBeyond JCAPS
  • Sonic MQ
  • WebLogic
  • JMS
  • WebMethods
  • WebSphere MQ
Ok so, lets start Setting up HermesJMS
1. To install HermeJMS first download HermesJMS from sourceforge and run "java –jar hermes-installer-1.12.jar” where you have placed your installer jar file. Open and edit /bin/hermes.bat or hermes.sh. Add the path to your WLS JVM at the beginning of the file right after the REM comments

set PATH=C:\bea\jdk160_05\jre\bin
set JAVA_HOME=
C:\bea\jdk160_05

Save hermes.bat/hermes.sh whichever is applicable in your case.


OR
1.you can download Latest version of SOAPUI 3.5 and install it on your machine. HermesJMS will be installed with SOAPUI 3.5 automatically and you can start HermesJMS as shown in below screenshot.


Click on the image to enlarge.


After installation of hermesJMS on any of the above way, if you are using jdk1.6 then you also need to modify /bin/hermes.bat file.
Add -Dsun.lang.ClassLoader.allowArraySyntax=true in startup command.


2. On HermesJMS Window select Action menu and select New -> New Session that will display Preferences screen. In bottom of the window select "providers" tab as shown below.


Click on the image to enlarge.


Right click inside the window and select Add Group. And provide the name say Weblogic10g in classpath group name.

3. Expand the Weblogic10g group and add library to the classpath group by right clicking on library.

For weblogic 9.0 you will require to add weblogic.jar file but if you are using weblogic 10g or higher version you will require to create wlfullclient.jar file from utility provided by Weblogic as mentioned in below steps.


  • go to C:\bea\wlserver_10.3\server\lib path on command prompt
  • execute java -jar wljarbuilder.jar command
  • And file will be created with name wlfullclient.jar in current directory.
4. Now go back to session tab and enter the Session name "Weblogic JMS Local"

In plugin name select "Bea Weblogic" and In Connection factory frame select "weblogic10g" and click on Apply button so that it can load required properties which you need to set as shown in below screenshot and after that click on OK.

Click on the image to enlarge.

Note : ProviderURL propery needs to be set to
t3://host:port

Many users found it difficult to setup Hermes for Clustered Environment. So here is a trick, you will require to give here host and port of any of the cluster. Like t3://:host_name_of_any_single_cluster:port_of_that_same_cluster

Note : Sometime you may not get plugin name listed then just click on OK & close the Preferences window and reopen it, it should get displayed.


5. Now in left side window in HermesJMS you should be able to see the session "Weblogic JMS Local". Right click on that session and select "discover". HermesJMS will find out all the JMS resource located in Weblogic server and list it for you as shown in below screenshot.

Click on the image to enlarge.

In this list Select and particular Queue and right click on it and then select "browse". It will display all messages contained withing that queue in right pane of the window. And you can go through the content of messages.