Showing posts with label Tutorial. Show all posts

Thursday, August 6, 2015

How to Create / Configure / Maintain JMS Server & Module in Weblogic 11g / 12c

In this post here i have tried to put across step by step process to create JMS Server , JMS Module etc to complete required full configuration for Weblogic JMS server for 12c. Steps will remain same for weblogic 11g as well.


  • Login to Weblogic console and go to Domain Structure -> Services -> Messaging
  • Select JMS Server
  • Create a new JMS Server page will open, enter below details
  • Click Next
  • On the next screen select Target. It should be the server where you want to create this JMS Server.
  • Click Finish 
  • Now we have JMS Server and we need to add JMS Module 
  • Go to Domain Structure -> Services -> Messaging -> Select JMS Module
  • Click on New button to create new JMS Module
  • Enter required information in create new JMS page
    • Name : UserJMSModule
    • Descriptor : UserJMSModule
    • Location in Domain : leave it blank to create it at default location and click Next
  •  On the next page select appropriate target server where you want to deploy this JMS Module and select Next
  • In the next window leave the check box "Would you like to add resources to this JMS system module?" unchecked and click finish
  • Message should be displayed as "The JMS module was created successfully". 
  • Under settings for UserJMSModule go to subdeployment tab and click New
  • Provide the name of subdeployment as "UserSubDeployment" and click next
  • Select the previously created "UserJMSServer" and click on finish and message should be displayed as "Subdeployment created successfully"
  • Click on Activate the changes to make the changes available for use in the domain.


Tuesday, May 22, 2012

How to write & Configuring JSON web service for Apache Axis2


Recently I was working on one of the project where there was requirement of implementing the Axis2 Web service with JSON support. Here I have used Apache Tomcat 7.0 Web Server for configuration. During initial phase I have gone through the documentation provided on Apache site for JSON Support and thought it would be easy to implement as we can write any POJO service first and that SOAP Service can be exposed as JSON Web Service.However it was not so simple as there were issues in the library used ie. Jettison. This library requires patch to support functionality.

JSON stands for Java Script Object Notation. And it is data exchange format similar to XML. JSON is very light weight and becoming popular these days.It defines data in key value pair as we are doing in case of Properties file however here we maintain parent child relationship as well. You can find more information on this on JSON website.

As this article is written on how to configure JSON with Apache Axis2 on Tomcat 7.0. Below details cover only technical information on how to configure JSON and writing JSON Web Service.

For this article I am using Tomcat version 7.0.26 and it has been installed Red hat 5.6.Axis2 is installed and configure as explain in Apache's Axis2 Website. 

Tomcat Installation directory is : /usr/share/apache-tomcat-7.0.26/
Axis2 Installation directory : /usr/share/apache-tomcat-7.0.26/webapps


JSON Configuration changes on Tomcat 7.0

  1. Download Dynamic Response Handler and copy it to  /usr/share/apache-tomcat-7.0.26/webapps/axis2/WEB-INF/modules    
  2. \Go to /usr/share/apache-tomcat-7.0.26/webapps/axis2/WEB-INF/lib and rename jettison-1.0-RC2.jar Using below command         mv jettison-1.0-RC2.jar jettison-1.0-RC2.jar.bak  
  3.  Provide update jettison jar file. Copy patched jettison-1.2-patched.jar to /usr/share/apache-tomcat-7.0.26/webapps/axis2/WEB-INF/lib location & restart tomcat
  4. Modify axi2.xml at location /usr/share/apache-tomcat-7.0.26/webapps/axis2/WEB-INF/conf Add following Message Formatters and Message Builders.


    <messageFormatter contentType="application/json" 
    
                              class="org.apache.axis2.json.JSONMessageFormatter"/>
    
             <messageFormatter contentType="application/json/badgerfish"
    
                              class="org.apache.axis2.json.JSONBadgerfishMessageFormatter"/>
    
            <!--<messageFormatter contentType="text/javascript" 
    
                             class="org.apache.axis2.json.JSONMessageFormatter"/> -->
    <messageBuilder contentType="application/json"
                                     class="org.apache.axis2.json.JSONOMBuilder"/>
      <messageBuilder contentType="application/json/badgerfish"
                                     class="org.apache.axis2.json.JSONBadgerfishOMBuilder"/>
      <!--<messageBuilder contentType="text/javascript"    
            class="org.apache.axis2.json.JSONOMBuilder"/>-->


    5. When we are performing conversion from XML to JSON and viceversa. There are two convention that we follow. which are mentioned above.
    - Mapped Convention
    - Badgerfish Convention

    Below is the example on how xml can be converted to JSON string for both the conventions which taken from Apache website

    XML If we use the namespace mapping as http://foo.com -> foo
    <xsl:root xmlns:xsl="http://foo.com"><data>my json string</data></xsl:root>


    Equivalent JSON (Mapped Convention)
    {"foo.root":{"data":"my json string"}}

    Equivalent JSON (Badgerfish Convention)
    {"xsl:root":{"@xmlns":{"xsl":"http://foo.com"},"data":{"$":"my json string"}}}


    Now you can simple develop your any web service application and can communicate with that service using JSON.

    6. You can simply create Hello World application to echo request message. and call that HelloWorld service as below get the response in JSON format.

    Mapped Convention : Http://localhost:8080/axis2/services/HelloWorldService/echoMethod/response=application/json

    Badgerfish Convention: Http://localhost:8080/axis2/services/HelloWorldService/echoMethod/response=application/json/
    7. And while sending a request to JSON service content-type should be set to application/json.

    I have not included the steps here to create POJO Service, this is very well documented on Apache website.

    Reference sites :
    http://jettison.codehaus.org/
    http://axis.apache.org/axis2/java/core/docs/json_support.html
    http://www.marcusschiesser.de/2009/01/building-a-json-web-service-with-java-and-axis2/


Thursday, July 14, 2011

Installing Oracle XE 11g Database on Redhat 5.6 / Linux 64 bit

Recently Oracle has announced the Beta release of Oracle Express Edition (XE) 11g. Below is the step by step process for the installation of Oracle XE 11g database on Linux x86-64 machine.

Installation of Oracle XE 11g is pretty straight forward process and all step by step installation steps are included here in this tutorial. All XE version of oracle are very easy to install and configure while you are in development mode.

Oracle XE 11g Installation steps :
  1. You can download the most recent version of Oracle XE 11g database by refering the details on http://www.oracle.com/technetwork/database/express-edition/overview/index.html.
  2. This installation will require minimum of 1.5 GB of RAM, so please make sure you have required space available on your machine.
  3. Swap space required is 2 GB or twice the size of RAM. Whichever is less.
    1. To check current you can run command swapon -s on shell.
  4. And to start the installation it requires root permission on linux box.
  5. execute the below command to install the Oracle XE 11g 
  6. Oracle does not provide a way to install Oracle XE 11g on particular directory. It will install it directly on root /u01 but if you want to install this on directory of your choice use my post Hacker's choice.
  7. rpm -ivh oracle-xe-11.2.0-0.5.x86_64.rpm below is the command with output
  8.  rpm -ivh oracle-xe-11.2.0-0.5.x86_64.rpm
    Preparing...                ########################################### [100%]
       1:oracle-xe              ########################################### [100%]
    Executing post-install steps...

    You must run '/etc/init.d/oracle-xe configure' as the root user to configure the database.
  9. Execute below command to configure Oracle XE 11g database.
    $ /etc/init.d/oracle-xe configure
  10. It will ask for HTTP Port , database listener port, and password for the database which will be used for SYS and SYSTEM. Below is the complete installation output.
  11. --> /etc/init.d/oracle-xe configure

    Oracle Database 11g Express Edition Configuration
    -------------------------------------------------
    This will configure on-boot properties of Oracle Database 11g Express
    Edition.  The following questions will determine whether the database should
    be starting upon system boot, the ports it will use, and the passwords that
    will be used for database accounts.  Press to accept the defaults.
    Ctrl-C will abort.

    Specify the HTTP port that will be used for Oracle Application Express [8080]:

    Specify a port that will be used for the database listener [1521]:

    Specify a password to be used for database accounts.  Note that the same
    password will be used for SYS and SYSTEM.  Oracle recommends the use of
    different passwords for each database account.  This can be done after
    initial configuration:
    Confirm the password:

    Do you want Oracle Database 11g Express Edition to be started on boot (y/n) [y]:

    Starting Oracle Net Listener...Done
    Configuring database...Done
    Starting Oracle Database 11g Express Edition instance...Done
    Installation completed successfully.

     
  12. Now start the Oracle XE 11g database by using below command
  13. --> /etc/init.d/oracle-xe start
  14. If you want to stop command is --> /etc/init.d/oracle-xe stop
    Uninstalling the Oracle XE 11g #
    --> rpm -qa | grep oracle 
    --> rpm -e oracle-xe


How to enable GUI while connecting to Remote Redhat / Linux machine using Putty

Hi, This post cover details about how we can enable GUI interfacing using Xserver while connecting to Remote Redhat 5.6 / Linux Machine using Putty on Windows based local machine.

First all of you need to install Xserver in your local box. Here is the download location for Windows. Here Xserver will be installed using Xming.
Location :  http://sourceforge.net/projects/xming.

After downloading install the Xming server in your localbox and run it with option ":0 -clipboard -multiwindow -ac". To do this, right click the short cut of Xming -> go to properties -> and in target  its should look similar to this "C:\Program Files\Xming\Xming.exe" :0 -clipboard -multiwindow -ac (here double quates are part of the string itself), depending on the location of Xming installation path may change.

On Redhat / Linux machine has feature called X11Forwarding, depending on the value of this parameter it enables or disables the display of graphics on the server.

On Redhat / Linux machine
For example, 
  1. login on Linux/BSD system called myserver.mydomain.com
  2. Open /etc/ssh/sshd_config file using text editor:
    1. # vi /etc/ssh/sshd_config
  3. Find out parameter X11Forwarding and set it to yes:
    1. X11Forwarding yes
    2. Save file & exit shell prompt
  4. Restart sshd service under Debian Linux:
    1. # /etc/init.d/ssh restart
    2. Alternatively, if you are using Fedora / Red Hat Linux restart sshd:
    3. # /etc/init.d/sshd restart

Client Side Setting on Windows Machine
For connecting to Redhat Linux box I am using the most popular SSH client putty. Below are the steps to configure putty on Windows machine.

  1. Run the putty.exe
  2. provide Host Name (or you can use IP address of host machine as well
  3. Select SSH as Connection Type 
  4. Port should be 22 default
  5. Enter again the same name as you entered in Hostname in to Saved Session Input box.
  6. In Connection Category, Find out the Connection Tree. In SSH, expand it and you will see "Enable X11 Forwarding".. 
  7. Enable X11 Forwarding by selecting the check box
  8. X Display location  should be set to localhost:0
  9. Save this entire information as a session by click on Save button
  10. Now start the Xming Server on location machine
  11. Now connect to the Redhat / Linux Machine using saved session from putty
  12. And to verify that Graphics are enable use this command xclock &
  13. You should be able to new graphical window coming up.
Now you are all set to roll, you can execute and run any GUI based application from the Redhat / Linux box and it will get displayed on you local machine. Makes your life much easier :) cheers

Monday, July 4, 2011

Purging / Deleting / Limiting Database Growth in SOA Schema in SOA Suite 11g

This post is about how to control the SOA database schema and its growth while running SOA Suite 11g. All the instructions given here are specifically for SOA Suite 11g version 11.1.1.4. From this version onward there are new scripts provided by Oracle and only updated scripts should be used as this version has schema and table structure changes.

There are basically three ways to delete/purge the SOA  Schema database.
  1. Using Enterprise Manager console -> Delete with options
  2. Deleting large number of instances using purge script
  3. Partitioning component database table
Using Enterprise Manager Console : Here, first option, using Enterprise Manager console is ok for small amount of instances where you want to remove one or two thousand instances . For large number of instances it will throw Time out error.There is a option provided in EM console for increasing the timeout period but still its not enough for large amount of data.

Deleting Large Number Of Instances Using Purge Script :  This is very useful and straight forward process to clean up SOA database schema. In real world , server are receiving millions of requests in a day and keeping these all data as instances in SOA Suite database schema is very costly. It can affect a performance of the server up to some extent. After few days or month probably you will start receiving table space errors as allotted all the table sapce is already been used by the instances created within SOA database schema. For this reason you need to plan your tablesapce accordingly and generally it should be in between 50 GB - 80 GB in loaded server. And still it requires regular purging for data on the SOA database.

Below is the process for purging / deleting the composite instances from SOA Database schema.

1. First of all you will required Repository creation utility for 11.1.1.4. This installable contain the all required purging script provided by oracle to purge the database schema. You can find the purge script at location RCU_HOME/rcu/integration/soainfra/sql/soa_purge.

Note : this script can not run with Microsoft SQL Server and IBM DB2 Database.

2. In SQL*Plus, connect to the database AS SYSDBA:

3. Execute the following SQL commands:
                      GRANT EXECUTE ON DBMS_LOCK to dev_soainfra;
                      GRANT CREATE ANY JOB TO dev_soainfra;

4. RCU_HOME/rcu/integration/soainfra/sql/soa_purge/soa_purge_scripts.sql

5. execute SET SERVEROUTPUT ON on SQL prompt

6.  execute below SQL block and description of each variable is given below

  • min_creation_date : minimum date when instance was created
  • max_creation_date : Maximum date when instance was created
  • batch_size :Batch size used to loop the purge. The default value is 20000.
  • max_runtime :Expiration at which the purge script exits the loop. The default value is 60. This value is specified in minutes. 
  • retention_period :Retention period is only used by the BPEL process service engine only (in addition to using the creation time parameter). The default value is null
  • purge_partitioned_component  : Users can invoke the same purge to delete partitioned data. The default value is false

DECLARE

   MAX_CREATION_DATE timestamp;
   MIN_CREATION_DATE timestamp;
   batch_size integer;
   max_runtime integer;
   retention_period timestamp;

BEGIN

   MIN_CREATION_DATE := to_timestamp('2011-06-23','YYYY-MM-DD');
   MAX_CREATION_DATE := to_timestamp('2011-07-03','YYYY-MM-DD');
    max_runtime := 15;
    retention_period := to_timestamp('2011-07-04','YYYY-MM-DD');
   batch_size := 5000;
     soa.delete_instances(
     min_creation_date => MIN_CREATION_DATE,
     max_creation_date => MAX_CREATION_DATE,
     batch_size => batch_size,
     max_runtime => max_runtime,
     retention_period => retention_period,
     purge_partitioned_component => false);
  END;


 Here is very important to note that this script provided is able to delete instances from database schema however it will not free up the memory of that table / tablespace.

For freeing up the memory you can try this option below on tables.

alter table enable row movement.
alter table shrink space;


Friday, December 31, 2010

Tutorial 3 : How to Install Oracle SOA Suite 11g -11.1.1.3 Part III - Running Repository Creation Utility

In this tutorial I am going to cover Schema creation in Oracle XE database which is required as a starting step before installing the SOA Suite 11g.

Here in this tutorial we are going to Run Repository Creation Utility provided by Oracle for SOA Suite 11g ( Version 11.1..1.3 ).

Go to the folder where you have downloaded the Repository Creation Utility version 11.1.1.3 ( c:\SOAInstallables as per tutorial I)

Double click the rcu.bat in folder structure similar to ofm_rcu_win_11.1.1.3.0_disk1_1of1\rcuHome\BIN\ and you should see below screen sequence.

1. Welcome Screen


2.  As we want to create requred schema for installation select create.


3. Provide the required details 
 Note : username used here is SYS, this should be the user with SYSDBA role


4. Select the Components for which you want to generated schema tables.


5. Here you can choose to provide single username / password for all schema component or also you do have flexibility to provide username/password for individual components. For development environment use single username/password for all components.


6.  This screen will allow you to choose different tables spaces for the components. kept it defult and press next.


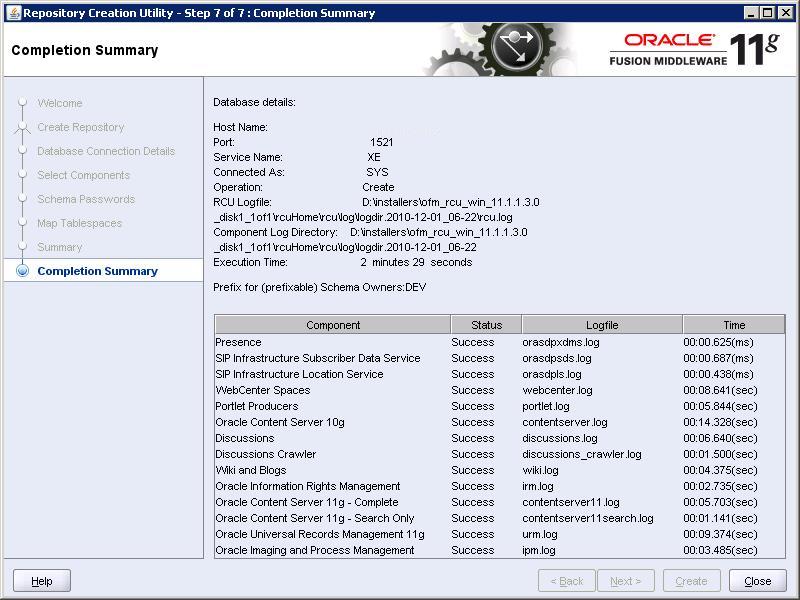
7. Summary of all installation is generated at the last. Click close the finish the process.


Wednesday, December 1, 2010

Upgrade Weblogic Server 10.3.2.0 to Weblogic Server 11g (10.3.3.0)

Here in this tutorial we are going to upgrade Oracle Weblogic Server 10.3.2.0 to Weblogic Server 11g i.e. 10.3.3 Version. This is very simple are pretty straight forward process.

If you are upgrading SOA Suite 11g 11.1.1.2 to SOA Suite 11.1.1.3 they you may required this to upgrade you Weblogic Server 10.3.2.0. 

Go to the Program Files and Weblogic Installation and select Smart Update.

This is gona ask you for username and password for Oracle Support as shown in below screen shot. Provide the required information and login,


Now you should able to see Smart Update Wizard Screen as shown below, go to the Maintanance Packs and select Update.


As shown in below screen select release 10.3.2.0  and in right you should be able to see Weblogic Platform (10.3.3.0) in Upgrade options. Click OK


This will start Oracle Installer for Weblogic server 10.3.3.0 as shown in below screen. Click Next


Uncheck if you dont want to receive any update from oracle


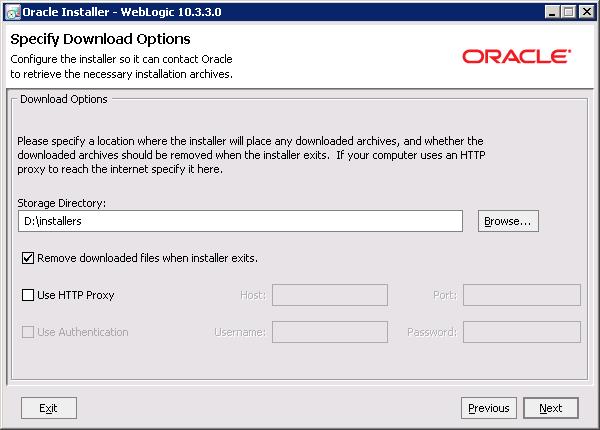
Select the location where you want to download the installation files.


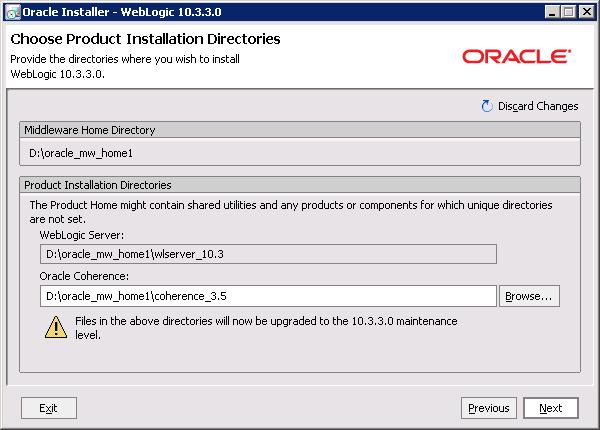
Here in below screen you need to specify in which directories you want to install the upgrade. Click Next to start installation process


After successful installation/upgrade you should be able to see below screen.


That's it. you done with the upgrade.

Tutorial 2 : How to Install Oracle SOA Suite 11g (11.1.1.3) Part II - Installing Oracle XE Database

Beginning Oracle Database 11g Administration: From Novice to ProfessionalIn this tutorial, I am going to cover installation for the Oracle database  required for SOA Suite 11g. For developement purpose we are going to use Oracle Express edition of Database i.e. Oracle XE database. This tutorial and screen shots taken all are for Windows operation system but process is more or less similar in other operation systems as well.

This tutorial has to be followed properly and Oracle XE database has to be installed and configured perfectly. For successfull installation of SOA Suite 11g, this Oracle XE database has to be up and running before proceeding further for other tutorials.

If you have not download yet, Get the latest copy from Oracle website at http://www.oracle.com/technetwork/database/express-edition/downloads/index.html and save it to c:\SOAInstallables (This is the same director which we have created in first tutorial of How to Install Oracle SOA Suite 11g.

When you download the Oracle XE database make sure you download the Universal Installer
Oracle Database 10g: The Complete Reference (Osborne ORACLE Press Series)

Note : When you are running Repository creation utility for creating schema in database before installing SOA Suite 11g, you will see warning that the database you are using is too old. you can safely ignore this warning as it applies for production environment.

As you are installing the Oracle XE as database server for SOA Suite 11g installation, It is important to know that what is the version when we say we are using Oracle XE Database. Database version for Oracle XE is 10.2.0.1 and SOA Suite 11g Installation requires actually 10.2.0.4 or higher or 11.1.0.7 or higher. And that is the reason we are getting the warning while running the Repository Creation Utility before installing SOA Suite 11g. Oracle XE is very good choice for small footprint database in SOA Suite 11g development environment.


Ok, Now you are ready to start with the installation of Oracle XE database for seting up SOA Suite 11g development environment.

Step 1 : Go to c:\SOAInstallables directory and click on OracleXEUniv.exe and It will start the Installation wizard as below. Click Next to proceed


Step 2: As shown in below screen shot select "I accept" and click Next


Step 3 : Specify the location where you want to install Oracle 10g Express Edition server and click next.


Step 4 : specify the password for the SYS and SYSTEM
user account for this database


Step 5 : Reviw the setting and click on Install


Step 6 :  Wizard will start installing and copying files


Step 7 : Click on Finish


Step 8 : Go to this URL http://127.0.0.1:8080/apex/ and login using SYS and password you have specified for the SYS and SYSTEM user accounts while creating database.  You will be able to see four icons
  • Administration
  • Object browser
  • SQL
  • Utilities
You won't need Oracle client here, all can be done from this User Interface.


Tutorial 1 : How to Install Oracle SOA Suite 11g (11.1.1.3) Part I

Oracle SOA Suite 11g is consists of multiple oracle products and hence it requires to install and configure each of those products in particular sequence to make it work.

Here in this tutorial, I am going to list all the products you will require to install for Oracle SOA Suite 11g (11.1.1.3) and what are the requirement for those products to work correctly. And in next subsequent tutorials I am going to cover each product installation one by one. Below is the list of Tutorials and I am going update this post as and when I am ready with subsequent product installation tutorials.

Tutorial 2 : Installing Oracle 10g Express Edition database
Tutorial 3 : Creating repository using Repository Creation Utility ( version 11.1.1.3)

Memory Requirements : 

To install Oracle SOA Suite 11g, you will required atleast total around 12 GB of memory space including installable files, else you may need to seperate out your installation of SOA Server, Weblogic Server, JDeveloper and Database server separately on different machines.

Download Installable Files :
Download all below files and store it at particular location on local machine say c:\SOAInstallables
Go to the http://www.oracle.com/technetwork/middleware/soasuite/downloads/index.html and download required software.

We are going to install SOA Suite 11g (11.1.1.3) and all the products needs to be install for setting up SOA Suite 11g (11.1.1.3) are listed at http://www.oracle.com/technetwork/middleware/soasuite/downloads/index.html.
  • Database 
    If you don't already have an Oracle database installed, choose Oracle Express Edition for a small footprint database. (Oracle XE is suitable for development only. Ignore the warning during installation about the database version as that pertains to production installations.)
  • WebLogic Server
    Download WebLogic Server 10.3.3.from the FMW download page, in the Runtime Software section
  • Repository Creation Utility
    Download RCU 11.1.1.3.0 from the FMW download page, in the Required Additional Software section.
  • SOA Suite & Patch
    Download SOA Suite 11.1.1.2.0 from the FMW download page, in the Runtime Software section.
    Download SOA Suite 11.1.1.3.0 (patch) from the FMW download page, in the Runtime Software section.
  • JDeveloper
    Download JDeveloper 11.1.1.3.0 from the FMW download page. Look for JDeveloper and Application Development Framework in the Required Addition Software section.
  • SOA Extension for JDeveloper
    Install the SOA Extension using the JDeveloper Update Center. From the JDeveloper menu choose Help > Check for Updates. In the Update Wizard, select Search Update Centers and ensure Oracle Fusion Middleware Products is checked ( screenshot). Then ensure that Oracle SOA Composite Editor is checked ( screenshot, your version may not match the screenshot exactly). The SOA Extension is approximately 200 MB.

Overall process installation map will be something similar to below.
Image from Oracle.com

Thursday, August 5, 2010

HermesJMS - Installation, Setup & Monitoring JMS Queue, Topic

Professional Oracle WebLogic Server (Wrox Programmer to Programmer)This blog is specifically for the people who requires real time monitoring of the JMS resoruces and their in & out. This posting is for installation & setup of HermesJMS Tool on windows environment for monitoring Weblogic 9/10g/or higher versions's JMS resources.

From weblogic 9 onwared , bea (now oracle) started providing web UI for monitoring JMS messages but for a single flow of message traveling through many number of JMS resources like topic , queue etc on Web UI is such headache. At this time HermesJMS is very handy tool to monitor and capture all those details.

HermesJMS Installation, Setup & Monitoring Tutorial

HermesJMS is an extensible console helps you communicate with JMS providers making your life lot easier to browse or search queues and topics, copy messages around and removing them. It fully integrates with JNDI letting you discover administered objects stored, create JMS sessions from the connection factories and use any destinations found. Many providers include a plugin that uses the native API to do non-JMS things like getting queue depths (and other statistics) or finding queue and topic names

Supports following providers :


IBM® MQ Series® and Websphere MQ® Interview Questions, Answers, and Explanations: Unofficial MQ Series® Certification Review


    IBM® MQ Series® and Websphere MQ® Interview Questions, Answers, and Explanations: Unofficial MQ Series® Certification Review
  • Active MQ
  • Arjuna MQ
  • Tibco EMS
  • Fiorano MQ
  • JBoss MQ
  • JORAM
  • OpenJMS
  • Oracle, Pramati
  • SAP
  • SeeBeyond ICAN
  • SeeBeyond JCAPS
  • Sonic MQ
  • WebLogic
  • JMS
  • WebMethods
  • WebSphere MQ
Ok so, lets start Setting up HermesJMS
1. To install HermeJMS first download HermesJMS from sourceforge and run "java –jar hermes-installer-1.12.jar” where you have placed your installer jar file. Open and edit /bin/hermes.bat or hermes.sh. Add the path to your WLS JVM at the beginning of the file right after the REM comments

set PATH=C:\bea\jdk160_05\jre\bin
set JAVA_HOME=
C:\bea\jdk160_05

Save hermes.bat/hermes.sh whichever is applicable in your case.


OR
1.you can download Latest version of SOAPUI 3.5 and install it on your machine. HermesJMS will be installed with SOAPUI 3.5 automatically and you can start HermesJMS as shown in below screenshot.


Click on the image to enlarge.


After installation of hermesJMS on any of the above way, if you are using jdk1.6 then you also need to modify /bin/hermes.bat file.
Add -Dsun.lang.ClassLoader.allowArraySyntax=true in startup command.


2. On HermesJMS Window select Action menu and select New -> New Session that will display Preferences screen. In bottom of the window select "providers" tab as shown below.


Click on the image to enlarge.


Right click inside the window and select Add Group. And provide the name say Weblogic10g in classpath group name.

3. Expand the Weblogic10g group and add library to the classpath group by right clicking on library.

For weblogic 9.0 you will require to add weblogic.jar file but if you are using weblogic 10g or higher version you will require to create wlfullclient.jar file from utility provided by Weblogic as mentioned in below steps.


  • go to C:\bea\wlserver_10.3\server\lib path on command prompt
  • execute java -jar wljarbuilder.jar command
  • And file will be created with name wlfullclient.jar in current directory.
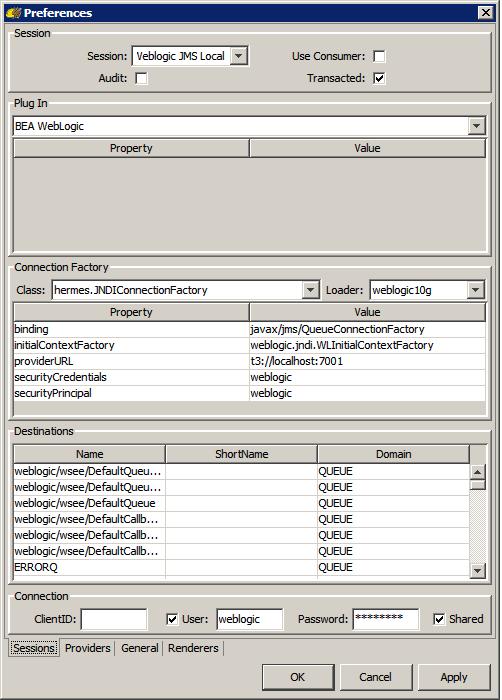
4. Now go back to session tab and enter the Session name "Weblogic JMS Local"

In plugin name select "Bea Weblogic" and In Connection factory frame select "weblogic10g" and click on Apply button so that it can load required properties which you need to set as shown in below screenshot and after that click on OK.

Click on the image to enlarge.

Note : ProviderURL propery needs to be set to
t3://host:port

Many users found it difficult to setup Hermes for Clustered Environment. So here is a trick, you will require to give here host and port of any of the cluster. Like t3://:host_name_of_any_single_cluster:port_of_that_same_cluster

Note : Sometime you may not get plugin name listed then just click on OK & close the Preferences window and reopen it, it should get displayed.


5. Now in left side window in HermesJMS you should be able to see the session "Weblogic JMS Local". Right click on that session and select "discover". HermesJMS will find out all the JMS resource located in Weblogic server and list it for you as shown in below screenshot.

Click on the image to enlarge.

In this list Select and particular Queue and right click on it and then select "browse". It will display all messages contained withing that queue in right pane of the window. And you can go through the content of messages.