Showing posts with label 11g. Show all posts

Monday, February 2, 2026

How to create JMS Queue / Topic in Weblogic 12c / 11g

In this post I have tried to listed down all required steps to create JMS Queue which can be utilized for reliably transfer the data between two systems. Here is the steps by step process on how to create a JMS Queue in Weblogic 12c / 11g.

In order to complete below steps you must have created your JMS Server and JMSModule. If this is not done please go through the previous post on How to create JMS Server and JMS Module to complete the require steps.

  • Go to weblogic console and login to the domain
  • Go to domain Structure ->Services -> Messaging ->JMS Module
  • It will show you the list of all available module on the right pane of the window. Select "UserJMSModule" from the JMS Modules table.
  • This will land up in "Configuration" tab  under "UserJMSModule"
  • Click New in Summary of resource table and select Queue and click next
  • Enter the name of the queue as UserQ and JNDI name as eis/UserQ. and leave the template as none. This can be any values you want. Click on Next

  • Now Select the subDeployment as "UserSubDeployment" which we created in previous steps.and click on finish
  • You should be getting a Message JMS Queue is created successfully.
Now you are ready to use this queue for storing the messages.

Thursday, August 6, 2015

How to Create / Configure / Maintain JMS Server & Module in Weblogic 11g / 12c

In this post here i have tried to put across step by step process to create JMS Server , JMS Module etc to complete required full configuration for Weblogic JMS server for 12c. Steps will remain same for weblogic 11g as well.


  • Login to Weblogic console and go to Domain Structure -> Services -> Messaging
  • Select JMS Server
  • Create a new JMS Server page will open, enter below details
  • Click Next
  • On the next screen select Target. It should be the server where you want to create this JMS Server.
  • Click Finish 
  • Now we have JMS Server and we need to add JMS Module 
  • Go to Domain Structure -> Services -> Messaging -> Select JMS Module
  • Click on New button to create new JMS Module
  • Enter required information in create new JMS page
    • Name : UserJMSModule
    • Descriptor : UserJMSModule
    • Location in Domain : leave it blank to create it at default location and click Next
  •  On the next page select appropriate target server where you want to deploy this JMS Module and select Next
  • In the next window leave the check box "Would you like to add resources to this JMS system module?" unchecked and click finish
  • Message should be displayed as "The JMS module was created successfully". 
  • Under settings for UserJMSModule go to subdeployment tab and click New
  • Provide the name of subdeployment as "UserSubDeployment" and click next
  • Select the previously created "UserJMSServer" and click on finish and message should be displayed as "Subdeployment created successfully"
  • Click on Activate the changes to make the changes available for use in the domain.


Thursday, October 6, 2011

Why Oracle Service Bus 11g ? Key Benefits and Advantages

This blog covers key benefits and advantages we can achieve with the implementation of Oracle Service Bus 11g. Actually I have been asked by Client to list down the capabilities they will get with the Oracle Service Bus 11g Implementation and this is what they got from me and lead to this blog finally.

1. Service Virtualization :

                      A core principle of SOA is to ensure that any service consumer can access any service provider - and from any platform. This has been considered as key principle in OSB and it provides robust way of Vitalizing the Service. It’s a great value add in SOA Architecture.

2. Loose Coupling

                     OSB provides loose coupling by mediating between Service provided and Consumer. Without mediation Service consumer and provider will create dependency to each other. A change in single side provider/consumer will lead to the change dependent consumer/provider respectively. OSB bridges the gap of transport, message format, security technology etc.

3. Location Transparency

                     It’s a strategy to hide physical location of actual physical location of service endpoints from the Service Consumer. All Service consumers should know only single logical machine & port name for each service. This allows for greater flexibility when managing your services. You can add, move, prioritize and remove service endpoints as needed without needing to recompile your service consumer again.

4. Seamless Connectivity

                     While newer applications may expose services over standard, easily consumable interfaces such as SOAP, an overwhelming majority of the services available in enterprises are still locked in legacy systems, from mainframes to custom applications. The first task of an OSB is to ensure that all these existing assets can be easily accessed and integrated. An OSB offers rich and comprehensive connectivity options to standard interfaces (SOAP, messaging, etc.) and also to packaged applications and legacy systems via adapters such Siebel Adapter, Peoplesoft Adapter etc.

5. Routing

                     After having a seamless connectivity next task is that data and messages need to flow reliably. OSB offers efficient, secure and reliable transport options. OSB also provides advance routing facilities to determine where the data needs to go. Such routing can be done based on headers, content or other external rules.

6. Performance

                      OSB is stateless & light weight; hence provide the excellent performance result under stress conditions as well.

7. Transformation

                       Oracle Service Bus provides run time transformation capability and support industry standard for middleware :XML, XSLT, XQuery & XPath.

8. Support for Event Driven Architecture

                       Oracle Service Bus support Oracle’s latest Event Driven Architecture.

9. Security & Policy

                        OSB provides centralized way of implementing the Security for Integration which results into highest level of standardization and control on security issues. Security is best enforced using policy driven framework because it allows to implement security details outside of the Application & easy to maintain. This makes it complete pluggable component & highly Agile which can be changed without modifying the actual application as per the organization policy’s and compliance.

10. Service Polling

                       Oracle Service Bus supports service polling. This allows to OSB to automatically detect live service and remove others from the list. This has a significant impact in performance.

11. Load balancing & Failover

                       Oracle Service Bus supports multiple load balancing algorithms to load balance between endpoints. It automatically detects a failover and removes it from Load balanced urls.

12. Service Throttling

                       Service throttling is a new feature in Oracle Service Bus which allows to restrict the load for particular service. This has great value when it comes to Service up time.

13. Monitoring

                       Oracle Service Bus provides two way monitoring.
Proactive Monitoring: Here Integrator can monitor the dashboard and check the performance of the service bus which can help to tune the server effectively. Tracking the server performance over time can help to plan capacity planning well in advance.

Reactive Monitoring: Here OSB will monitor the Server and look for specific conditions to occur and it will automatically sends the Alert to users, Admin etc. Alert can be in the form of Email, JMS, SMS etc.

14. Message Validation

                       Oracle Service Bus support normal data level value check validation as well as Schematron Validation.

15. Value Added Feature

                  a. Support for Domain Value Map

                  b. Support for Cross Reference

                  c. Support for Package application Adapters

                  d. Support for Advance message formats such as SWIFT and FIX in financial Service Domain.

Wednesday, October 5, 2011

Decrease / Increase / Resize tablespace in Oracle Database

Below is the list of commands you can use to increase / decrease / Resize your tablespace in Oracle Database. I run this commands in Oracle 11g database however these should also run fine in other versions of Oracle as well.

Adding more tablespace
Alter tablespace  add datafile 'datafile_location_where_file_will_be_added_without_file_name' size 1G;

Checking size of datafiles
Select name, bytes from v$datafile;


Decreasing Tablespace
Say your datafile is of size of 10 gb and you want to decrease it by 6 GB you can use below command.
Alter database datafile 'complete_path_to_datafile_goes_here' resize 4G;

Above command may not work it space is already utilized and data is alredy there in the file. Oracle may throw appropriate error message like below.

ORA-03297: file contains used data beyond requested RESIZE value


Thursday, July 14, 2011

Installing Oracle XE 11g Database on Redhat 5.6 / Linux 64 bit

Recently Oracle has announced the Beta release of Oracle Express Edition (XE) 11g. Below is the step by step process for the installation of Oracle XE 11g database on Linux x86-64 machine.

Installation of Oracle XE 11g is pretty straight forward process and all step by step installation steps are included here in this tutorial. All XE version of oracle are very easy to install and configure while you are in development mode.

Oracle XE 11g Installation steps :
  1. You can download the most recent version of Oracle XE 11g database by refering the details on http://www.oracle.com/technetwork/database/express-edition/overview/index.html.
  2. This installation will require minimum of 1.5 GB of RAM, so please make sure you have required space available on your machine.
  3. Swap space required is 2 GB or twice the size of RAM. Whichever is less.
    1. To check current you can run command swapon -s on shell.
  4. And to start the installation it requires root permission on linux box.
  5. execute the below command to install the Oracle XE 11g 
  6. Oracle does not provide a way to install Oracle XE 11g on particular directory. It will install it directly on root /u01 but if you want to install this on directory of your choice use my post Hacker's choice.
  7. rpm -ivh oracle-xe-11.2.0-0.5.x86_64.rpm below is the command with output
  8.  rpm -ivh oracle-xe-11.2.0-0.5.x86_64.rpm
    Preparing...                ########################################### [100%]
       1:oracle-xe              ########################################### [100%]
    Executing post-install steps...

    You must run '/etc/init.d/oracle-xe configure' as the root user to configure the database.
  9. Execute below command to configure Oracle XE 11g database.
    $ /etc/init.d/oracle-xe configure
  10. It will ask for HTTP Port , database listener port, and password for the database which will be used for SYS and SYSTEM. Below is the complete installation output.
  11. --> /etc/init.d/oracle-xe configure

    Oracle Database 11g Express Edition Configuration
    -------------------------------------------------
    This will configure on-boot properties of Oracle Database 11g Express
    Edition.  The following questions will determine whether the database should
    be starting upon system boot, the ports it will use, and the passwords that
    will be used for database accounts.  Press to accept the defaults.
    Ctrl-C will abort.

    Specify the HTTP port that will be used for Oracle Application Express [8080]:

    Specify a port that will be used for the database listener [1521]:

    Specify a password to be used for database accounts.  Note that the same
    password will be used for SYS and SYSTEM.  Oracle recommends the use of
    different passwords for each database account.  This can be done after
    initial configuration:
    Confirm the password:

    Do you want Oracle Database 11g Express Edition to be started on boot (y/n) [y]:

    Starting Oracle Net Listener...Done
    Configuring database...Done
    Starting Oracle Database 11g Express Edition instance...Done
    Installation completed successfully.

     
  12. Now start the Oracle XE 11g database by using below command
  13. --> /etc/init.d/oracle-xe start
  14. If you want to stop command is --> /etc/init.d/oracle-xe stop
    Uninstalling the Oracle XE 11g #
    --> rpm -qa | grep oracle 
    --> rpm -e oracle-xe


Hacker's Choice - How to Install Oracle 11g XE on Specified Targeted Directory

If you are installing Oracle 11g XE on Linux machine, it is getting installed by default on root (/). And it does not provide a way to change.

Oracle is not providing a way to specify the destination directory / user defined directory for Oracle XE 11g Database. So here is the hack for how to install Oracle XE database on directory of your choice.

create a symbolic link with the name /u01 in root directory which point to /app/oracle.
For Oracle XE 11g  use below commands
--> cd /
--> ln -s / u01

Same trick works for Oracle XE 10g as well.

And .... yeah enough you are done. Go ahead with your normal installation and it will be installed to /app/oracle.

Monday, July 4, 2011

Purging / Deleting / Limiting Database Growth in SOA Schema in SOA Suite 11g

This post is about how to control the SOA database schema and its growth while running SOA Suite 11g. All the instructions given here are specifically for SOA Suite 11g version 11.1.1.4. From this version onward there are new scripts provided by Oracle and only updated scripts should be used as this version has schema and table structure changes.

There are basically three ways to delete/purge the SOA  Schema database.
  1. Using Enterprise Manager console -> Delete with options
  2. Deleting large number of instances using purge script
  3. Partitioning component database table
Using Enterprise Manager Console : Here, first option, using Enterprise Manager console is ok for small amount of instances where you want to remove one or two thousand instances . For large number of instances it will throw Time out error.There is a option provided in EM console for increasing the timeout period but still its not enough for large amount of data.

Deleting Large Number Of Instances Using Purge Script :  This is very useful and straight forward process to clean up SOA database schema. In real world , server are receiving millions of requests in a day and keeping these all data as instances in SOA Suite database schema is very costly. It can affect a performance of the server up to some extent. After few days or month probably you will start receiving table space errors as allotted all the table sapce is already been used by the instances created within SOA database schema. For this reason you need to plan your tablesapce accordingly and generally it should be in between 50 GB - 80 GB in loaded server. And still it requires regular purging for data on the SOA database.

Below is the process for purging / deleting the composite instances from SOA Database schema.

1. First of all you will required Repository creation utility for 11.1.1.4. This installable contain the all required purging script provided by oracle to purge the database schema. You can find the purge script at location RCU_HOME/rcu/integration/soainfra/sql/soa_purge.

Note : this script can not run with Microsoft SQL Server and IBM DB2 Database.

2. In SQL*Plus, connect to the database AS SYSDBA:

3. Execute the following SQL commands:
                      GRANT EXECUTE ON DBMS_LOCK to dev_soainfra;
                      GRANT CREATE ANY JOB TO dev_soainfra;

4. RCU_HOME/rcu/integration/soainfra/sql/soa_purge/soa_purge_scripts.sql

5. execute SET SERVEROUTPUT ON on SQL prompt

6.  execute below SQL block and description of each variable is given below

  • min_creation_date : minimum date when instance was created
  • max_creation_date : Maximum date when instance was created
  • batch_size :Batch size used to loop the purge. The default value is 20000.
  • max_runtime :Expiration at which the purge script exits the loop. The default value is 60. This value is specified in minutes. 
  • retention_period :Retention period is only used by the BPEL process service engine only (in addition to using the creation time parameter). The default value is null
  • purge_partitioned_component  : Users can invoke the same purge to delete partitioned data. The default value is false

DECLARE

   MAX_CREATION_DATE timestamp;
   MIN_CREATION_DATE timestamp;
   batch_size integer;
   max_runtime integer;
   retention_period timestamp;

BEGIN

   MIN_CREATION_DATE := to_timestamp('2011-06-23','YYYY-MM-DD');
   MAX_CREATION_DATE := to_timestamp('2011-07-03','YYYY-MM-DD');
    max_runtime := 15;
    retention_period := to_timestamp('2011-07-04','YYYY-MM-DD');
   batch_size := 5000;
     soa.delete_instances(
     min_creation_date => MIN_CREATION_DATE,
     max_creation_date => MAX_CREATION_DATE,
     batch_size => batch_size,
     max_runtime => max_runtime,
     retention_period => retention_period,
     purge_partitioned_component => false);
  END;


 Here is very important to note that this script provided is able to delete instances from database schema however it will not free up the memory of that table / tablespace.

For freeing up the memory you can try this option below on tables.

alter table enable row movement.
alter table shrink space;


Friday, December 31, 2010

Tutorial 3 : How to Install Oracle SOA Suite 11g -11.1.1.3 Part III - Running Repository Creation Utility

In this tutorial I am going to cover Schema creation in Oracle XE database which is required as a starting step before installing the SOA Suite 11g.

Here in this tutorial we are going to Run Repository Creation Utility provided by Oracle for SOA Suite 11g ( Version 11.1..1.3 ).

Go to the folder where you have downloaded the Repository Creation Utility version 11.1.1.3 ( c:\SOAInstallables as per tutorial I)

Double click the rcu.bat in folder structure similar to ofm_rcu_win_11.1.1.3.0_disk1_1of1\rcuHome\BIN\ and you should see below screen sequence.

1. Welcome Screen


2.  As we want to create requred schema for installation select create.


3. Provide the required details 
 Note : username used here is SYS, this should be the user with SYSDBA role


4. Select the Components for which you want to generated schema tables.


5. Here you can choose to provide single username / password for all schema component or also you do have flexibility to provide username/password for individual components. For development environment use single username/password for all components.


6.  This screen will allow you to choose different tables spaces for the components. kept it defult and press next.


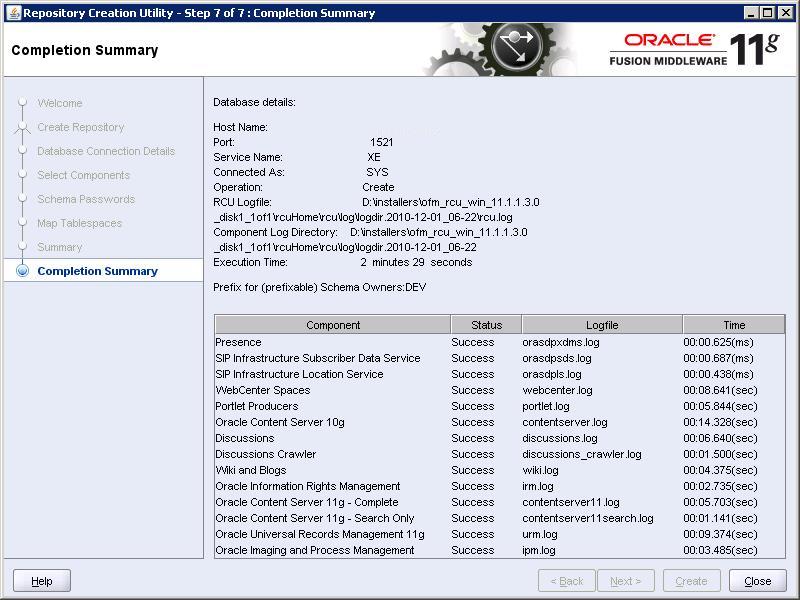
7. Summary of all installation is generated at the last. Click close the finish the process.


Wednesday, December 1, 2010

Upgrade Weblogic Server 10.3.2.0 to Weblogic Server 11g (10.3.3.0)

Here in this tutorial we are going to upgrade Oracle Weblogic Server 10.3.2.0 to Weblogic Server 11g i.e. 10.3.3 Version. This is very simple are pretty straight forward process.

If you are upgrading SOA Suite 11g 11.1.1.2 to SOA Suite 11.1.1.3 they you may required this to upgrade you Weblogic Server 10.3.2.0. 

Go to the Program Files and Weblogic Installation and select Smart Update.

This is gona ask you for username and password for Oracle Support as shown in below screen shot. Provide the required information and login,


Now you should able to see Smart Update Wizard Screen as shown below, go to the Maintanance Packs and select Update.


As shown in below screen select release 10.3.2.0  and in right you should be able to see Weblogic Platform (10.3.3.0) in Upgrade options. Click OK


This will start Oracle Installer for Weblogic server 10.3.3.0 as shown in below screen. Click Next


Uncheck if you dont want to receive any update from oracle


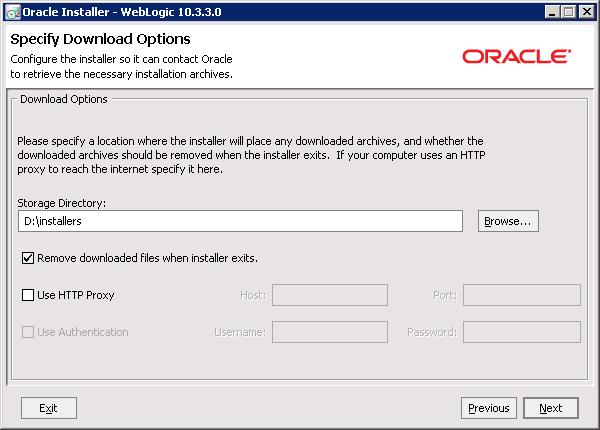
Select the location where you want to download the installation files.


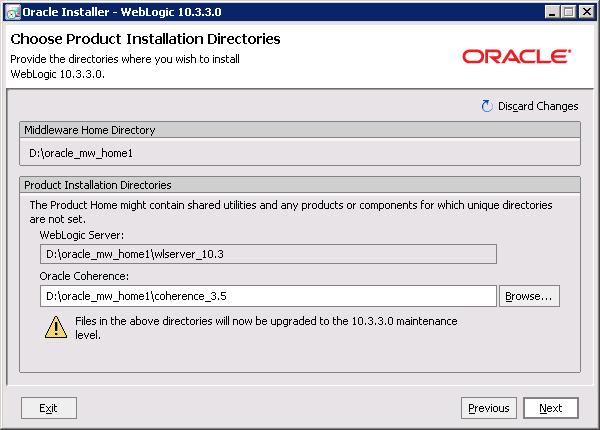
Here in below screen you need to specify in which directories you want to install the upgrade. Click Next to start installation process


After successful installation/upgrade you should be able to see below screen.


That's it. you done with the upgrade.

Tutorial 2 : How to Install Oracle SOA Suite 11g (11.1.1.3) Part II - Installing Oracle XE Database

Beginning Oracle Database 11g Administration: From Novice to ProfessionalIn this tutorial, I am going to cover installation for the Oracle database  required for SOA Suite 11g. For developement purpose we are going to use Oracle Express edition of Database i.e. Oracle XE database. This tutorial and screen shots taken all are for Windows operation system but process is more or less similar in other operation systems as well.

This tutorial has to be followed properly and Oracle XE database has to be installed and configured perfectly. For successfull installation of SOA Suite 11g, this Oracle XE database has to be up and running before proceeding further for other tutorials.

If you have not download yet, Get the latest copy from Oracle website at http://www.oracle.com/technetwork/database/express-edition/downloads/index.html and save it to c:\SOAInstallables (This is the same director which we have created in first tutorial of How to Install Oracle SOA Suite 11g.

When you download the Oracle XE database make sure you download the Universal Installer
Oracle Database 10g: The Complete Reference (Osborne ORACLE Press Series)

Note : When you are running Repository creation utility for creating schema in database before installing SOA Suite 11g, you will see warning that the database you are using is too old. you can safely ignore this warning as it applies for production environment.

As you are installing the Oracle XE as database server for SOA Suite 11g installation, It is important to know that what is the version when we say we are using Oracle XE Database. Database version for Oracle XE is 10.2.0.1 and SOA Suite 11g Installation requires actually 10.2.0.4 or higher or 11.1.0.7 or higher. And that is the reason we are getting the warning while running the Repository Creation Utility before installing SOA Suite 11g. Oracle XE is very good choice for small footprint database in SOA Suite 11g development environment.


Ok, Now you are ready to start with the installation of Oracle XE database for seting up SOA Suite 11g development environment.

Step 1 : Go to c:\SOAInstallables directory and click on OracleXEUniv.exe and It will start the Installation wizard as below. Click Next to proceed


Step 2: As shown in below screen shot select "I accept" and click Next


Step 3 : Specify the location where you want to install Oracle 10g Express Edition server and click next.


Step 4 : specify the password for the SYS and SYSTEM
user account for this database


Step 5 : Reviw the setting and click on Install


Step 6 :  Wizard will start installing and copying files


Step 7 : Click on Finish


Step 8 : Go to this URL http://127.0.0.1:8080/apex/ and login using SYS and password you have specified for the SYS and SYSTEM user accounts while creating database.  You will be able to see four icons
  • Administration
  • Object browser
  • SQL
  • Utilities
You won't need Oracle client here, all can be done from this User Interface.


Tutorial 1 : How to Install Oracle SOA Suite 11g (11.1.1.3) Part I

Oracle SOA Suite 11g is consists of multiple oracle products and hence it requires to install and configure each of those products in particular sequence to make it work.

Here in this tutorial, I am going to list all the products you will require to install for Oracle SOA Suite 11g (11.1.1.3) and what are the requirement for those products to work correctly. And in next subsequent tutorials I am going to cover each product installation one by one. Below is the list of Tutorials and I am going update this post as and when I am ready with subsequent product installation tutorials.

Tutorial 2 : Installing Oracle 10g Express Edition database
Tutorial 3 : Creating repository using Repository Creation Utility ( version 11.1.1.3)

Memory Requirements : 

To install Oracle SOA Suite 11g, you will required atleast total around 12 GB of memory space including installable files, else you may need to seperate out your installation of SOA Server, Weblogic Server, JDeveloper and Database server separately on different machines.

Download Installable Files :
Download all below files and store it at particular location on local machine say c:\SOAInstallables
Go to the http://www.oracle.com/technetwork/middleware/soasuite/downloads/index.html and download required software.

We are going to install SOA Suite 11g (11.1.1.3) and all the products needs to be install for setting up SOA Suite 11g (11.1.1.3) are listed at http://www.oracle.com/technetwork/middleware/soasuite/downloads/index.html.
  • Database 
    If you don't already have an Oracle database installed, choose Oracle Express Edition for a small footprint database. (Oracle XE is suitable for development only. Ignore the warning during installation about the database version as that pertains to production installations.)
  • WebLogic Server
    Download WebLogic Server 10.3.3.from the FMW download page, in the Runtime Software section
  • Repository Creation Utility
    Download RCU 11.1.1.3.0 from the FMW download page, in the Required Additional Software section.
  • SOA Suite & Patch
    Download SOA Suite 11.1.1.2.0 from the FMW download page, in the Runtime Software section.
    Download SOA Suite 11.1.1.3.0 (patch) from the FMW download page, in the Runtime Software section.
  • JDeveloper
    Download JDeveloper 11.1.1.3.0 from the FMW download page. Look for JDeveloper and Application Development Framework in the Required Addition Software section.
  • SOA Extension for JDeveloper
    Install the SOA Extension using the JDeveloper Update Center. From the JDeveloper menu choose Help > Check for Updates. In the Update Wizard, select Search Update Centers and ensure Oracle Fusion Middleware Products is checked ( screenshot). Then ensure that Oracle SOA Composite Editor is checked ( screenshot, your version may not match the screenshot exactly). The SOA Extension is approximately 200 MB.

Overall process installation map will be something similar to below.
Image from Oracle.com

Friday, November 26, 2010

Difference & New features in Oracle Service Bus 11g

  1. Service Result Cache with Coherence :
    • Oracle Coherence 3.5
    • Oracle Service Bus now supports service result caching for business services with Coherence. Oracle Coherence is an in-memory data grid solution that lets organizations predictably scale mission-critical applications by providing fast access to frequently used data.
      Service result caching allows caching the response from a business service. This can dramatically improve performance if the response from the business service is relatively static. Oracle Service Bus uses a single cache for all business services. Only valid/correct results from business services are cached.
       
  2. Transaction :
    • With Oracle Service Bus, you can configure a proxy service to start and execute its message flow in the context of a JTA global transaction for non-transactional inbound transports (such as HTTP and JMS with a non-XA connection factory). In prior releases, the proxy service message flow executed in the context of a JTA global transaction only when the inbound transport started/propagated a global transaction (such as JMS/XA or SB with the transaction propagated).
    • With Oracle Service Bus, it is possible to execute both the request and the response pipelines in the context of the same JTA global transaction for non-synchronous inbound endpoints as well. 
  3. JMS Object Message :
    • In Oracle Service Bus, the JMS transport is enhanced to receive and send Java Objects to and from JMS queues/topics. The support is enabled by configuring a proxy or business service to have the Service Type Messaging:Java.
  4. JCA Adapters :
    • Oracle Service Bus provides support for Oracle SOA Suite 11g Release1 Patch Set 2 (11.1.1.3.0) JCA adapter artifacts. New Oracle Service Bus resource types for JCA Bindings and TopLink/EclipseLink mapping XML files are now available, as is support for normalized message properties in the transport headers. Upgrade for Oracle Service Bus 10g Release 3 JCA artifacts is seamless.
      Certification for File and BAM adapters has also been added. Automatic upgrade of Oracle Service Bus 10g Release 3 services using JCA adapter artifacts based on Oracle SOA Suite/JDeveloper 10g Release 3 is provided.
  5. New Transport : 
    •  Newly introduced JEJB transport for invoking EJB 3.0. 
    • It also support exposing proxy service as EJB 3.0 stateless session bean.
  6. Split Join Enhancements :
    • Transaction Support : can execute within context of JTA transaction
    • Wait : can halt execution of branch for specified duration
  7. Transport Enhancements :
    1. JMS Failover For Request/Response Pair : For both Correlation ID and Message patterns, Oracle Service bus provides enhanced high availability by letting you specify a response URI  ( any service account ) for each request URI in request/response JMS Business Service.
    2. Email Load Balancing : Oracle Service Bus 11g lets you specify multiple endpoint URLs for load balancing.